Chapter 4: Using DNTV Live! in TV Mode
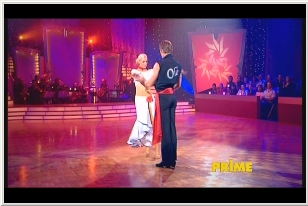
Watching Digital Television
DNTV Live! Employs a revolving time shifting buffer to continuously record
what you are viewing. This will allow the replay of any action that may have
been missed. Replay is available up to a user preset time limit, with the
default being one minute. The user can go back through the segment and view
the missed portion, and also record a certain portion if desired, all without
missing a single second! DigitalNow calls this Smart Time Shifting or Action
Replay.
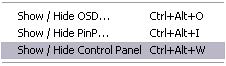
Please open DNTV Live! and select TV Mode. Now right click and select Channels.
This will bring up a list of channels scanned. This list will be available
until you disable it again by right clicking and selecting Channels again.
Click on the channel you would like to start viewing. The selected channel
will be tuned and you will be watching that channel within a matter of seconds.
The OSD (On Screen Display) will be shown for the default 5 seconds, displaying
the Channel, Channel Logo, Date and Time. You can change the amount
of time it is displayed in Chapter 2.
You can also access the desired channel by a Preset Key, this is described
in chapter 3. By pressing the allocated number on the keyboard or remote you
will have direct access to that channel.
Video Controls and Audio Controls are also provided, access to them is via
a right click menu. These settings also apply to DVD/Media Mode
- Video Controls
- Aspect Ratio (AR)
- Fullscreen – DNTV Live! Does not correct
the AR at all. Recommended for users with Widescreen Monitors or
Televisions.
- Original Aspect Ratio – DNTV Live! Will
place black bars above and below the picture to preserve the original
aspect ratio
- Crop – A centre-cut of the picture is
performed, to provide a full screen image. Useful for those with
Standard monitors and don’t like black bars.
- Zoom - This will zoom the video in from all sides.
Note: Zoom settings of a Digital TV channel
will be automatically stored and restored when the channel is viewed
again.
Note: Some Aspect Ratio controls
do not work with either of the VMR modes. In these cases, it is best to
use Overlay mode instead.
- Colour Controls
- Brightness – Adjusts the Brightness of
the picture
- Hue - Adjusts the Hue of the picture. Useful
when the picture is to ‘ Warm ’ (strong reds) or to
‘ Cool ’ (strong blues)
- Contrast – Adjusts the Contrast of the
picture
- Saturation – Adjusts the Saturation of
the picture
Note: Colour settings of a Digital TV channel
will be automatically stored and restored when the channel is viewed
again.
- Audio Controls
- Volume UP – Increase the volume
- Volume DOWN – Decrease the volume
- Mute – This will mute any audio coming from
DNTV Live!
Also, DNTV Live! allows you
to view another SD or HD channel using the Picture in Picture option if you have
more than one tuner installed.
Right click on the main
screen, move your mouse over 'PiP Channels', 'PiP HDTV Channels' then select
the channel you wish to watch. A small window will appear, which you can resize
and move to where you desire. If you would like to watch the PiP channel full
screen, double click on the PiP window and it will switch to the main screen,
and the main screen will be moved to the PiP window.
Using the Smart Time
Shifting and Action Replay functions
The default Time Shifting Mode is OFF. To enable Time Shifting either
select Timeshift ON/OFF to start without pausing or Pause to start and pause
immediately. A buffer is kept so you can
go back and re-watch something you missed, pause the current show or fast
forward through advertisements.
To pause your show, press ‘Pause’ on your remote control, this
will instantly pause what you are watching, and can be paused for the length
of time you set in Chapter 3J – the default being 30 minutes. To resume
your show, press play. To fast forward or re-wind, press pause and move the
slider to the desired position and press play. You can also move the slider
by using the ' Backward' and 'Forward' buttons on your remote.
The Action Replay function will jump back 1 minute and replay that last minute,
giving you an action replay.
Please remember your hard drive can fill up quickly with the Time Shifting
buffer, on average 30 minutes of SD DTV will take up 700mb. If you are low
on hard disk space, or you have an older computer, it is recommended you disable
Timeshifting. While in HDTV Mode, right click and go to 'Timeshift Controls'
and Select ' Time Shift ON/OFF '. Repeat this process to enable Timeshifting
again.

Using the Control Panel
The Control Panel enables you to do a number of things while watching a DVD
or HDTV all within the one convenient panel.
While in DVD or TV Mode, right click and select ' Show / Hide Control Panel
' to show or hide the control panel.
- CH + Channel Up
- CH - Channel Down
- DVB-T Stats - Uses the display area to show what any of
the 8 possible DVB-T Tuners
are doing, recording, PIP, HDTV etc
- DVB-S Stats - Uses the display area to show what any of
the 8 possible DVB-S Tuners
are doing, recording, PIP, HDTV etc
- EPG - Displays the Now and Next information on Tuner
1
- Record - This will instantly start recording the broadcast
from Tuner 1, the file name and directory are automatically created.
- Open - This will allow you to open a file to be played
within DNTV Live!
- Stop - This will stop file playback
- Play - This will play the selected file
- Pause - This will pause and start Timeshifting Live Digital TV or
pause file playback, to un-pause
press the button again.
- RW - This will rewind playback by the amount set in the DVD/Media
settings in the Configuration screen.
- FF - This will fast forward playback by the amount set in the
DVD/Media Settings in the Configuration screen.
- FM - This will enable FM Radio mode and scan to the station on
the top of the FM Stations list.
- V+ Increases the Volume
- Mute On/Off - Enables or Disables Mute
- V- Decreases the Volume

Recording Digital Television
When watching Live TV, right click and select Record
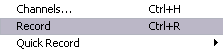
DNTV Live! Will automatically name the file and start recording to the directory
selected in Chapter 3h. To stop the recording, right click and select Record
again. Alternatively, you can use the Quick Record function.
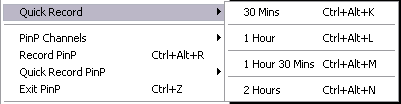
This lets you record in block of 30 minutes, 1 Hour, 1 Hour 30 mins and
2 Hours. Simply right click, move your mouse over Quick Record then click
on the desired amount of time. Or you can use the Scheduler to record, please
see the next section
Using the built in Scheduler
The DNTV Live! Scheduler enables you to schedule an unlimited number of programs to be recorded.
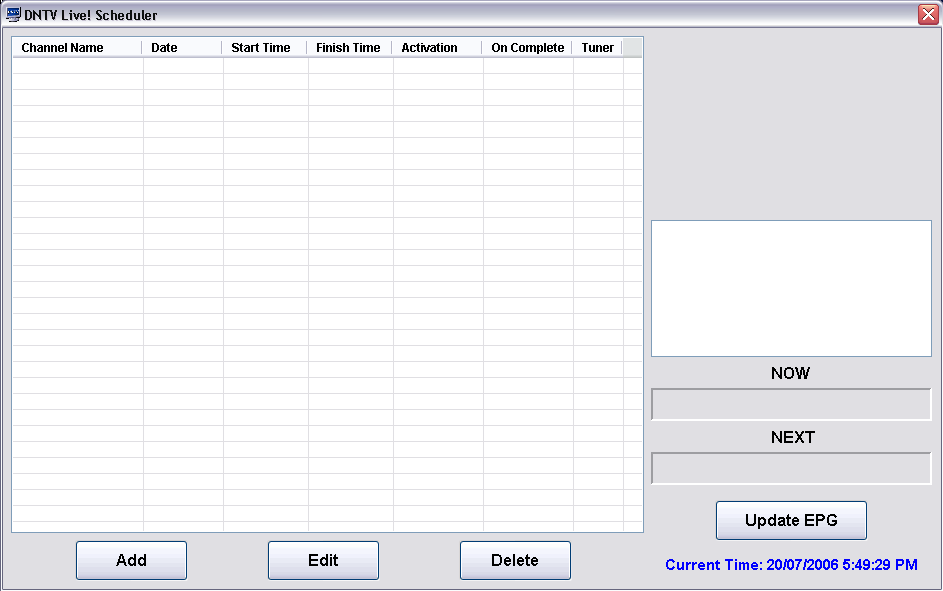
- Add - Press this to open the add scheduler dialog box where
you can specify all the parameters for the specific schedule.
- Edit - This will open the edit schedule dialog box for the
currently selected schedule in the list.
- Delete - Press this to permanently delete any schedule form
the list.
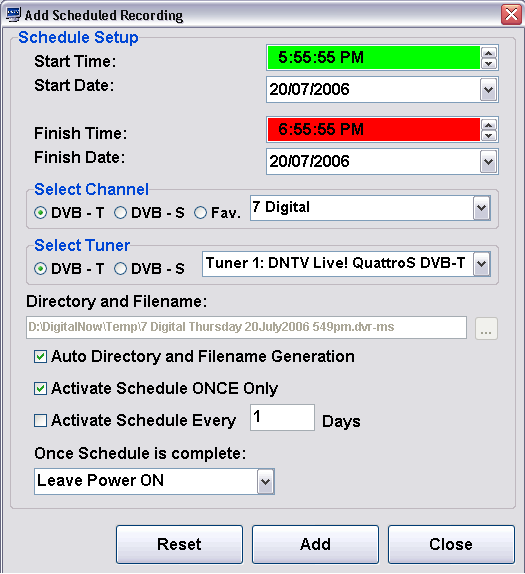
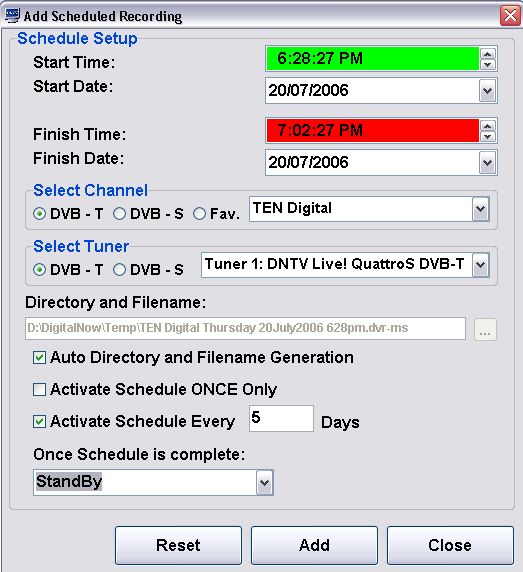
1.Start Time – Enter the time for the Schedule to start
2. Start Date – Enter the date for the Schedule to start
You can double click on the calendar icon to bring up a calendar to help
you choose.
3. Finish Time – Enter the time for the Schedule to Finish
4. Finish Date - Enter the date for the Schedule to Finish
You can double click on the calendar icon to bring up a calendar to help
you choose.
5. Select Channel – Select the desired channel to be recorded
6. Select Tuner – Select the tuner to be used for this particular recording.
7. Directory and Filename – Enter the directory for the recording to
be stored in and a filename for the recording.
Auto Directory and Filename Generation – Tick this
box if you would like DNTV Live! to automatically select where the recording
will be stored and its filename
Activate Schedule 1 Every X Days – When enabled,
this schedule will be run every 5 days from the Start Date. This is used for
weekly captures, for example recording Neighbours Monday – Friday.
Activate Schedule 1 ONCE only – When ticked that
particular schedule will run once at the set time and date, then will be finished
and won’t run again.
• Once Schedule is complete
– Choose between Leave Power ON, Hibernate, Stand by or Power OFF.
Once you have entered all the information you then must click ADD button
to add it to the schedules list. Note you can add schedules either in an
active or inactive state. The schedule must be in an active state by
selecting the appropriate activation selection otherwise it will be ignored
by DNTV Live!
DNTV Live! MUST be open for you schedules to be run, we recommend keeping
DNTV Live! in the taskbar, letting your schedules run and enabling fast access
to the program.
Here is an example of how to setup a schedule for an active weekly recording
of Neighbours, with the computer set to Standby after each recording:
Using the EPG (Electronic Program
Guide)
The EPG will display 7 Days of program information as well as program descriptions.
This data can be sourced from the DVB Transport Stream (broadcasted) or from
XMLTV sources on the internet.
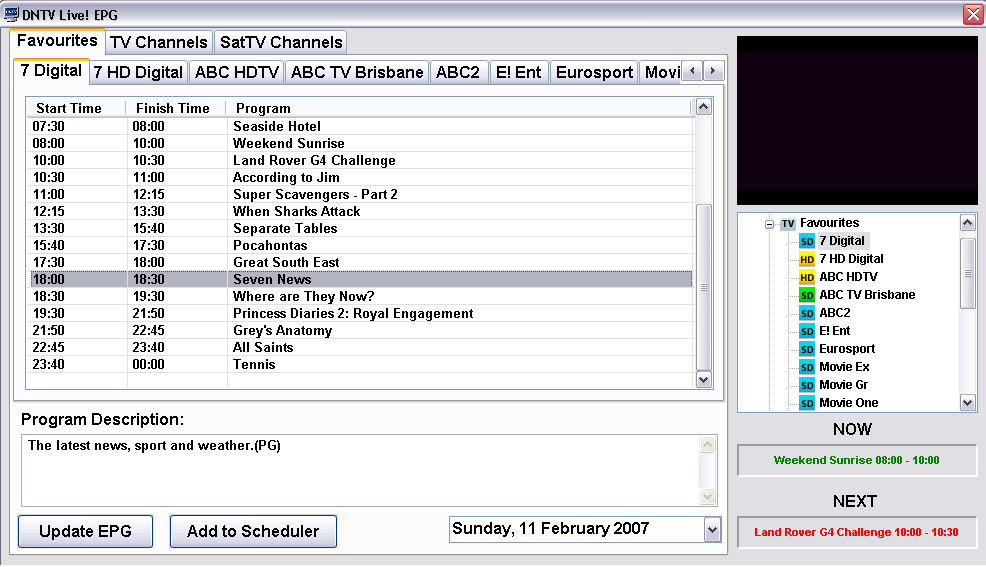
- Update EPG - When pressed this will update the selected tabs EPG
details.
- Add to Scheduler - When pressed this will open the add to
schedule dialog with all details automatically setup from the EPG
information.
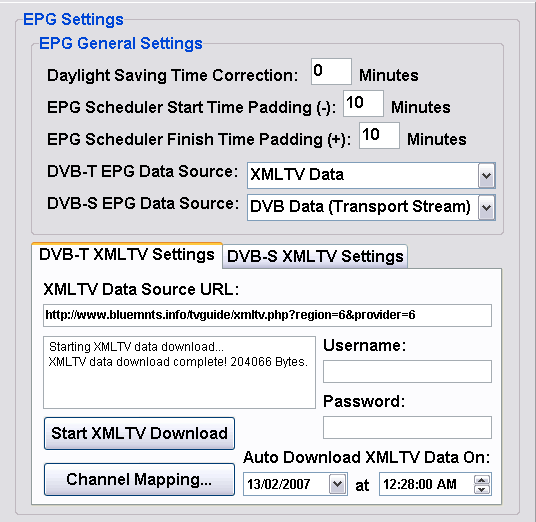
- Daylight Saving Time Correction - You can enter here the number of
minutes you turn your clocks forward for Daylight Saving so that the EPG
times reflect these changes. Time zone's are still automatically calculated
from your Windows settings.
- EPG Scheduler Start Time Padding (-) - Enter the amount of time
in minutes you wish to have automatically subtracted to the schedule start
time when adding a schedule from the EPG window. This will ensure you never
miss the start of a scheduled program.
- EPG Scheduler Finish Time Padding (+) - Enter the amount of time
in minutes you wish to have automatically added to the schedule finish time
when adding a schedule from the EPG window. This will ensure you never miss
the end of a scheduled program.
- DVB-T EPG Data Source - Select where you wish to source your EPG
data from for your DVB-T tuners and channels. DVB Data (Transport Stream)
- This option will extract available EPG data from the transport stream
from the broadcaster of interest. XMLTV Data - This option will use
data obtain from xmltv format files regularly available from the internet.
These files should be in xmltv format and have a filename of xmltv_dvbt.xml
located in the Xmltv folder in the DNTV Live! directory. XMLTV Data (ICE
TV)- This option will use data obtain from xmltv format files available
from ICE TV subscription service on the internet. Username and password for
your ICE TV account can be used directly in DNTV Live! to download this data
automatically. See settings below to allow DNTV Live! to download xmltv data
from the internet automatically.
- DVB-S EPG Data Source - Select where you wish to source your EPG
data from for your DVB-S tuners and channels. DVB Data (Transport Stream)
- This option will extract available EPG data from the transport stream
from the broadcaster of interest. XMLTV Data - This option will use
data obtain from xmltv format files regularly available from the internet.
These files should be in xmltv format and have a filename of xmltv_dvbs.xml
located in the Xmltv folder in the DNTV Live! directory. XMLTV Data (ICE
TV)- This option will use data obtain from xmltv format files available
from ICE TV subscription service on the internet. Username and password for
your ICE TV account can be used directly in DNTV Live! to download this data
automatically. See settings below to allow DNTV Live! to download xmltv data
from the internet automatically.
- XMLTV Data Source URL - Enter the url where your xmltv data
source is located. This url can also be a link to a .zip file. DNTV Live!
will unzip the file and setup the containing xml file with the correct
filename.
- Username - Enter a username if the url requires authentication
such as ICE TV accounts.
- Password - Enter a password if the url requires authentication
such as ICE TV accounts.
- Start XMLTV Download - Start downloading data from url.
- Auto Download XMLTV Data On - Select the date and time to
automatically download from the XMLTV Data Source URL. When this action is
completed it will auto increment the date by 2 days.
- Channel Mapping - Press to open the channel mapping dialog to map
currently tuned channels with channels available from the xmltv source. See
below for more detail.
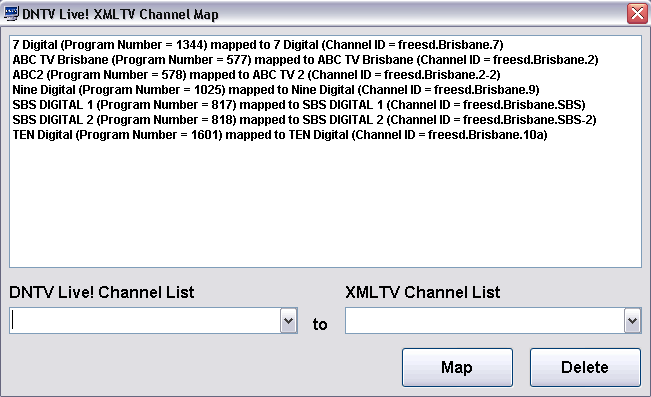
- Map - Press to map the currently selected DNTV Live! channel to
the currently selected XMLTV channel.
- Delete - Press to delete the selected mapped entry.
Digital Now wishes to thank Jeremy Barr, Kenneth Webb and David
Ngo for their assistance in putting together and keeping up-to-date this
Manual
